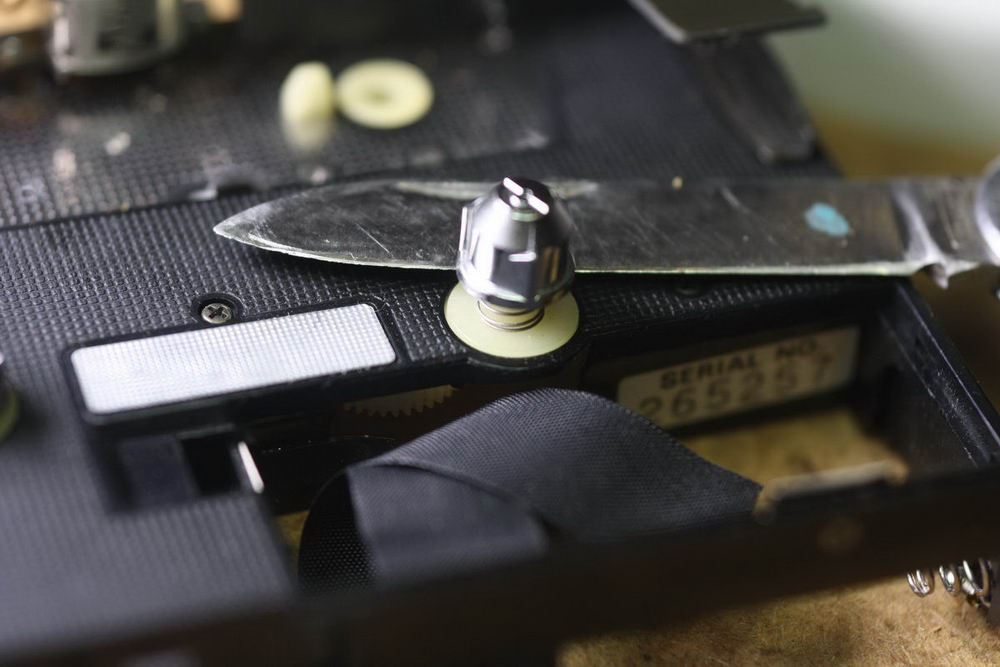
16. Adjust capstan wheel top screw.
This is very a important operation! After rubber ring replacement it is an absolute must. With this you will:
- adjust wow/flutter to a minimum
- ensure that power consumption will be as low as possible
- protect the motor bearings from high pressure
- ensure proper contact between motor and rubber capstan ring. Minimize the risk of creating an imprint of the rotor on the rubber ring

The walkman must be in PLAY operation. Connect the walkman to the power source, without a cassette inserted, and hit the PLAY button. There are two methods to achieve this:
a. Measuring the power consumption of the walkman using a multimeter. Normal consumption is 80 – 130 mA, depending on the model of walkman being used. As you tighten the adjustment screw, consumption will rise. As you loosen it, consumption will be lower. If you release it too much, you will get to a point, where the motor loses its contact with the rubber ring and consumption will not drop any further. Instead autostop will be activated and you’ll have to hit the PLAY button again. Tighten the screw until consumption starts to rise.
Example: You measure a 70 mA consumption when the plastic adjustment screw is unscrewed too much, i.e. it motor has no contact with the ring. Now, tighten the adjustment screw until the consumption starts to rise. When you measure 90mA, the adjustment is done.
Check it by trying to stop the capstan ring with your finger. If you can feel a torque, then adjustment is OK. If you feel that the rotor slips on the rubber ring, tighten it little more until you feel a torque.
b. Using finger-check method. Find the point, where the rotor stops slipping on the rubber capstan ring. Do not tighten it too much, just ensure that it doesn’t slip.
Apply screw lockers to this adjustment screw.
17. Adjust tape path if necessary (head height, azimuth).

If you do not have to, then it’s better not to touch these screws. When is it necessary?
- when you replace your headphones
- when the original setting is not correct and it does not match your cassette deck setting
For adjustments, you will need special calibration tapes:
- narrow track tape
- azimuth adjustment tape
Special instructions and equipment is needed, like e.g. an oscilloscope. It is out of the scope of this article.
Do not touch it if it isn’t necessary!
18. Other electrical adjustments, like output level and balance.
Special instructions and equipment is needed, like an oscilloscope, fulltrack-recorded output level calibration tape. It is out of scope of this article.
19. Check/re-solder headphone connector.
The headphone connector is one of the most strained parts. That’s why it is very often a point of failure. Missing one channel, missing stereo are typical symptoms of a failed connector joint. The problem is usually caused by a connector pin that’s become disconnected from the printed circuit board. Even if it isn’t, it is good to re-solder each one to refresh the solder joints.
20. Electrical parts replacement.
There is no need to replace electrolytic capacitors unless they’ve failed. The capacitors used in DD models rarely fail. I’ve fixed more than 200 DD units and have never seen a failed capacitor in them! Measurements show that capacity and ESR are still in specs.
On the other hand, there are some cheaper DD models, like the DD10, where I have never seen a good capacitor.
If the motor doesn’t move, the walkman runs too fast or speed cannot be regulated – a faulty servo controller IC is very typical for these DD walkmans. Luckily, these can be bought very cheap on eBay. Search for item cx20084.
In the case of the DD33, there’s a different controller used, that will sometimes fail. There is no replacement easily available. You can grab one from other walkman, like the WM-DD9 :), or better, the WM-DD22.
If the sound is distorted, it is very likely caused by a faulty audio headphone amplifier IC. These are very commonly used in many cheap models, so grab one and replace it. First, diagnostics is needed – it can be any part in signal path.
20. Organizing the wires.
I use black textile duct tape to attach wires to the printed circuit board.
Warning! Organize them in such a way that they never touch the motor! Otherwise wow/flutter will rise dramatically.
21. Installing the back cover.
This can be a little tricky. Take special care not to break the fragile switches installed on the printed circuit board. Put the plastic switch sliders on the back cover to the same position as switches on the printed circuit board.
Install all the screws, door-lock slider spring (except WM-DD33), install the door, insert fresh batteries and you’re ready to enjoy your nice and fantastic walkman.
Other cracked parts – how to fix them and/or preventive tasks
The typical problem no. 2 of many DD walkmans is other cracked plastic parts, like the small source gear, take-up assembly, plastic slider or reel hubs. If they are not yet cracked, we should do some preventive tasks so this won’t happen in the future.
You should check each of the parts displayed below.

From my experience, one of four walkmans have this gear cracked. Result is increased noise from the mechanics, high wow/flutter or even completely blocked mechanics. If the gear is not cracked yet, it is only a question of time before it does. However, we can prevent this by increasing the gear hole diameter to the original size (2.0 mm), as it were when new before it started to shrink.
For that we need to remove this small gear from the mechanics. Insert a pocket knife under the reel hub and pull it out. Be careful not to lose the spring and black plastic ring located under the reel hub. Now it’s time to increase the gear hole. Use the special 2.0 mm mill bit for that. Be careful, increase the hole diameter only to what’s needed.
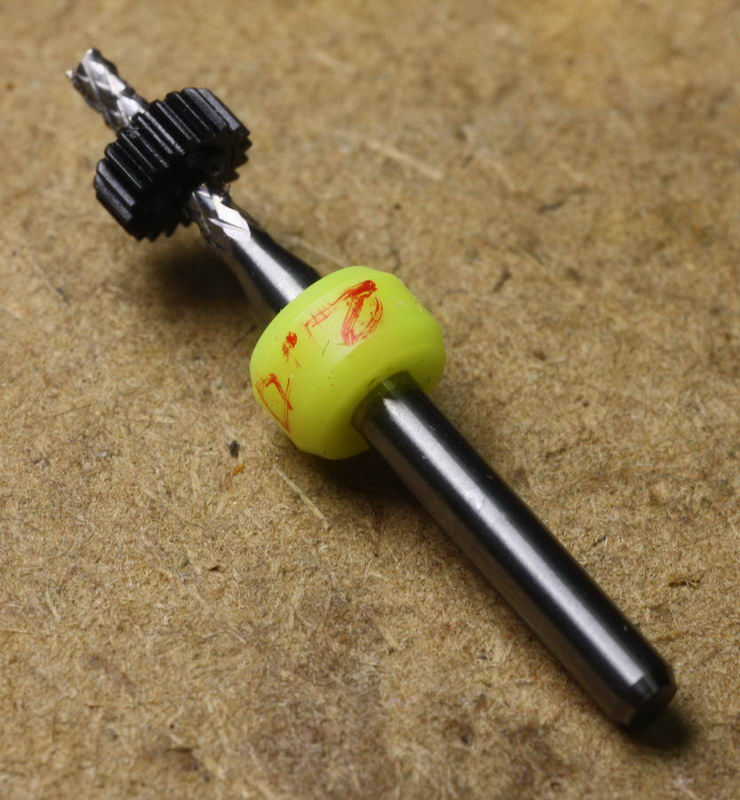
If the gear is cracked, you need to increase the hole diameter a little more. Push the gear firmly to close the gap, when increasing the hole. Then glue it back to the axle.